Trading rarely goes wrong because you didn’t know “enough.”
It goes wrong because you skipped a step.
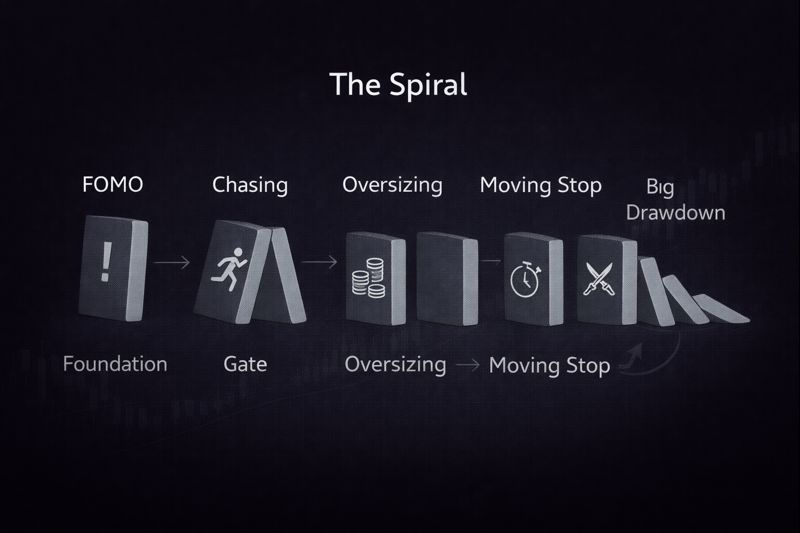
You entered before your trigger because you didn’t want to miss the move. You sized up because it looked “too good to pass.” You moved your stop because being wrong felt uncomfortable. You took a second trade immediately after a loss because you wanted relief.
None of those mistakes are complicated. They’re human.
That’s exactly why a trading checklist works: it turns the most important actions into a repeatable process, so you don’t rely on mood, memory, or willpower when price starts moving fast.
A checklist won’t make you predict the market. It will do something more valuable: it will help you execute the same way on your best days and your worst days. And when your execution becomes consistent, you finally get clean feedback—so you can improve faster.
In this guide, you’ll get the essential steps traders use to stay consistent across any market or strategy: a pre-market checklist to prepare, a pre-trade checklist to qualify setups, a “during trade” rule to prevent micromanaging, and a post-trade routine that turns every session into progress.
What is a trading checklist?
A trading checklist is a short set of questions you run through to confirm two things:
First: Does this trade actually qualify?
Second: Am I about to take it with controlled risk?
That’s it.
It’s not a trading strategy. It won’t tell you where to buy or sell. It’s a filter that helps you avoid “close enough” trades, emotional sizing, and impulsive management decisions. If you’re a beginner, a checklist is especially powerful because it forces you to do what beginners naturally avoid: slow down for ten seconds and answer uncomfortable questions like:
- “Is this really my setup, or is it just exciting?”
- “Is my stop based on invalidation, or comfort?”
- “Am I risking my normal amount, or improvising?”
- “Do I have a clear reason for entry, or am I chasing?”
Those questions feel small. But they’re often the difference between a controlled loss and a session that spirals.
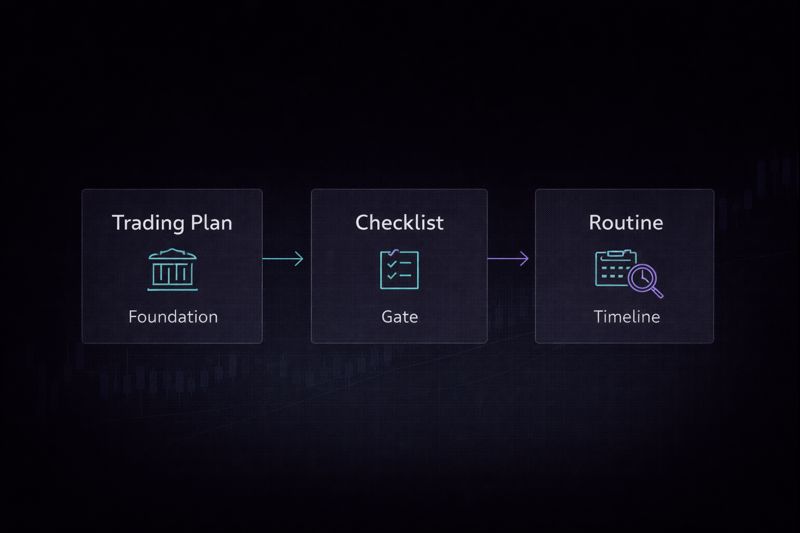
Trading checklist vs trading plan vs daily routine
These three work best together, but they’re not the same:
A trading plan is your overall rulebook: what you trade, your strategy rules, risk limits, management rules, and how you review performance.
A checklist is the practical gate you run before entry (and a quick debrief after exit).
A routine is the daily structure that makes your best behavior the default (so you don’t show up rushed and start clicking).
If you have a plan but no checklist, you’ll still break rules in the moment. If you have a checklist but no routine, you’ll often skip it because you’re scrambling. The checklist is the bridge between “knowing” and “doing.”
Why traders (especially beginners) need a checklist
Beginners usually don’t lose because they chose the wrong indicator.
They lose because they make one of these common decisions under pressure:
They enter too early.
They chase too late.
They don’t size based on risk.
They move stops.
They overtrade after a loss.
They keep trading when they’re tired or emotional.
A checklist helps because it attacks the real enemy in trading: inconsistent decision-making.
When your decisions change from trade to trade, your results will always feel random—because the process is random. A checklist makes the process stable.
That stability gives you three huge benefits:
1) Fewer avoidable losses.
Not every loss is avoidable. But many are. A checklist blocks the low-quality trades that “felt fine” in the moment.
2) Less emotional load.
When you already decided the rules, you don’t have to negotiate with yourself mid-trade. That alone reduces stress.
3) Faster improvement.
When you follow the same steps each time, you can review what happened and actually learn. You’ll know if the problem is setup quality, execution, or risk.
How to use this checklist so it actually works
Most checklists fail for one simple reason: they are either too long to use, or they get used at the wrong time. If your checklist feels like homework, you’ll skip it.
If you only run it after you’re already emotionally attached to the trade, you’ll rationalize every answer. So here’s the practical way to use a trading checklist:
Keep two versions.
- A live checklist that takes about 10 seconds.
- A full checklist you use for preparation and review.
The live checklist exists to protect you in the moment. The full checklist exists to help you build skill.
Also: make it visible.
Put it where you can’t ignore it—printed beside your keyboard, pinned as a note, or in a document you open every session. The goal is to remove friction. Friction kills consistency. Finally, use it as a gate, not a formality. If any key item fails, your default action is simple: pass.
That’s a mindset shift many traders never make. They treat checklists as confirmation that they “can” trade. You want the opposite: a checklist that gives you permission to not trade when the conditions aren’t right.
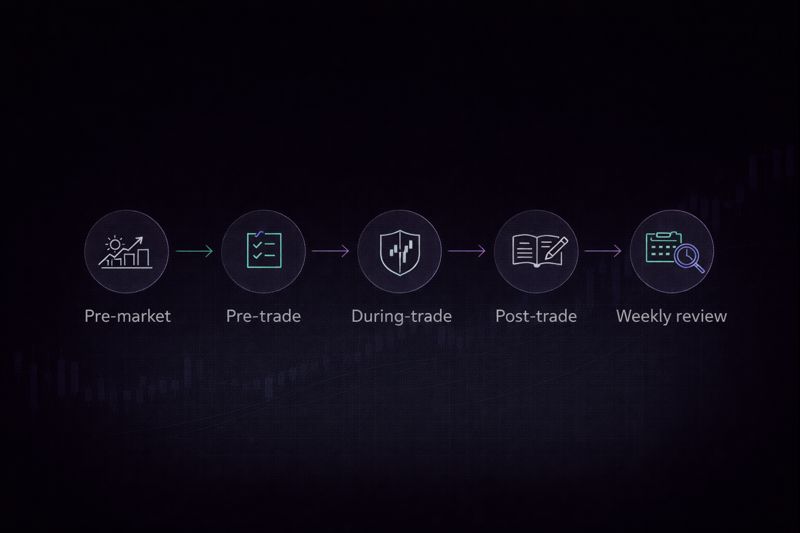
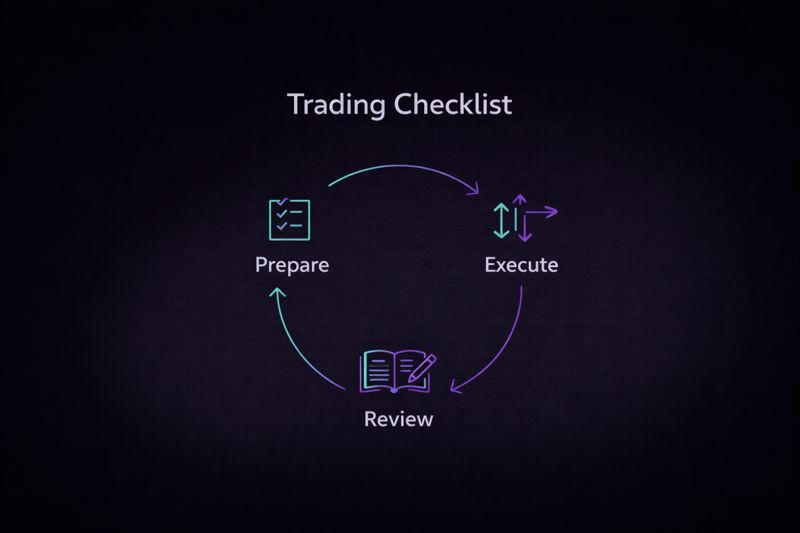
The core structure: the 3 essential phases
If you want a checklist that feels natural, structure it around the natural rhythm of trading:
Pre-market: prepare your mind, watchlist, and scenarios.
Pre-trade: qualify the specific trade before you enter.
Post-trade: capture what happened so you can improve.
You can add a light “during trade” rule (and you should), but most of your checklist power comes from the three phases above.
When people struggle with discipline, it’s often because one phase is missing:
- No pre-market → you trade whatever moves.
- No pre-trade gate → you take “close enough” setups.
- No post-trade routine → you repeat the same mistakes forever.
This guide follows that structure so you can plug it into your day without overthinking.

Pre-market checklist: prepare your mind, market, and plan for the day
Pre-market isn’t about predicting what will happen today. It’s about removing surprises and reducing the number of decisions you need to make later when the market is moving fast.
A good pre-market process creates a calm baseline. You know what you’re watching. You know what would make you act. You know when you’ll be cautious. And you know what conditions would make you sit on your hands.
1) Start with a quick mindset and environment check
This doesn’t need to be deep. It needs to be honest. Day trading is decision-making under speed. If you’re tired, distracted, or stressed, you will be more likely to break rules—especially around risk and trade selection.
So the pre-market question is simple: “Am I in a state where I can follow my own rules?”
If the answer is “not really,” you have options that still keep you consistent: Reduce size, trade only your best setup, or skip the session entirely. Skipping is not failure. Skipping is risk management.
2) Check the calendar and volatility windows
You don’t need to be a news expert. You just need to avoid being surprised.
High-volatility windows can change spreads, slippage, and price behavior. Beginners often get caught by this because they treat every moment of the session as equal.
A simple rule is: if a major event is near, you either avoid trading around it or tighten your selection criteria. The exact approach depends on your style, but the checklist ensures you’re making a deliberate choice instead of gambling on chaos.
3) Decide the market “mode” in one sentence
You’re not trying to be perfect here. You’re trying to choose appropriate behavior.
Is the market trending smoothly? Is it chopping sideways? Is it whipping around unpredictably?
Many strategies work best in specific conditions. If the market condition doesn’t match your strategy’s sweet spot, your checklist should make it harder to trade.
4) Mark key levels and define simple “if/then” scenarios
This is where your day becomes structured instead of reactive.
Mark the levels or zones you care about. Then define what you’ll do if price reaches them.
You don’t need ten scenarios. You need two or three that cover the most likely outcomes. The goal is to reduce live decision-making. When price reaches a key area, you already know what you’re looking for.
5) Keep your watchlist intentionally small
Beginners often watch too many instruments because it feels productive.
But too much scanning creates a constant sense of urgency: “Something is always happening somewhere.” That mindset fuels overtrading.
A small watchlist builds depth. You start to understand how your chosen instruments behave, how volatility changes through the session, and which moves are worth trading versus noise.
6) Do a quick platform and layout check
This is the boring part that prevents stupid mistakes.
Charts set up? Alerts ready? Order panel visible? Risk settings checked? Hotkeys correct if you use them?
The goal is to remove friction so execution is clean.
Pre-market checklist
Use this as a quick gate, not a giant to-do list:
- I’m in a state to follow my rules (or I reduce risk / skip)
- I know the key volatility windows for today
- I can describe the market condition in one sentence
- Key levels are marked; I have simple if/then scenarios
- Watchlist is small and intentional
- Platform and layout are ready
Pre-trade checklist: qualify the trade before you click
This is the heart of the trading checklist.
The pre-trade checklist exists to stop two types of trades:
- trades that don’t truly meet your setup criteria, and
- trades that meet criteria but are taken with sloppy risk.
The easiest way to think about pre-trade is as a gate. Most potential trades should fail the gate. That’s normal. Passing on trades is part of trading.
Setup quality: choose “A” or “pass”
Beginners often take mediocre setups because the market is open and they feel like they’re supposed to trade. That mindset is expensive.
A simple quality gate helps: you decide what “A-quality” means for your approach, and you only take those trades.
If you find yourself negotiating—“it’s mostly there”—that’s a sign the trade isn’t clean.
An A-quality setup usually has clarity. You can explain it quickly. You can identify the trigger. You can define invalidation. You can see the logic.
Trigger: the trade must be activated, not assumed
The trigger is the moment you act. Without a trigger, you’re guessing.
Many beginners lose money by entering because the setup is forming, not because it actually triggered. It feels proactive, but it often means you’re early and emotionally exposed.
A checklist forces patience: “No trigger, no trade.”
Stop loss: define invalidation (where the trade idea is wrong)
This is one of the most powerful checklist rules you can adopt.
Before entry, you should know where the trade idea breaks. Not where you feel uncomfortable—where the idea is invalid.
If you can’t define that level, you don’t have a clean trade idea. And if you don’t have a clean trade idea, you’ll manage it emotionally.
Position sizing: risk-based, not vibe-based
Your position size should come from your risk rule, not your confidence level.
A beginner-friendly approach is fixed risk per trade. That means your lot size (or position size) changes based on how far your stop is.
This is the key: you don’t choose size first and then squeeze the stop to make it fit. You choose the stop based on invalidation, then choose size to match your fixed risk.
That order matters.
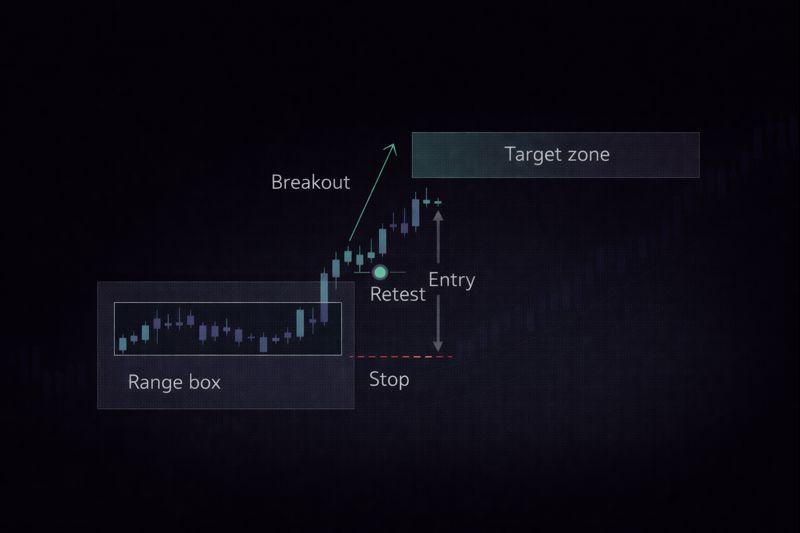
“Room” check: does the trade have space to work?
This is where many trades fail in a way beginners don’t notice.
Even if the setup is good, if price has no room to move before it hits a major barrier, the trade is often not worth taking.
Your checklist can include a simple question: “Does this trade have enough space to justify the risk?” That one question blocks a surprising number of low-quality trades.
No-trade filters: the rules that protect your worst days
No-trade filters aren’t there for your best day.
They’re there for the day you’re tired, frustrated, or trying to force results.
Examples of no-trade filters (keep yours short and strict):
- I hit my max daily loss.
- I’m on a losing streak and feel urgency.
- Spreads are unusually wide.
- Major volatility window is about to hit.
- I missed the trigger and feel tempted to chase.
When these filters are active, the decision is already made: you don’t trade.
That’s the whole point of a checklist.
Pre-trade checklist (short version)
- This is an A-quality setup
- The trigger is present (not “almost”)
- Stop is based on invalidation
- Size matches my fixed risk rule
- The trade has room to work
- No-trade filters are not active

During-trade checklist: manage without micromanaging
Most traders don’t lose discipline in pre-market.
They lose it during the trade.
They start managing because they want certainty. They want control. They want to avoid being wrong. They want to lock profit early so they don’t feel regret.
And that’s exactly why a “during trade checklist” should be extremely simple.
The best default rule for most traders is: do nothing unless a rule triggers action.
That doesn’t mean you never manage a trade. It means your management actions are planned, not emotional.
A simple way to structure this is to decide your “allowed actions” ahead of time. For example:
- You only adjust a stop when a specific structure forms.
- You only take partial profit at a specific level.
- You only move to break-even after a specific condition is met.
The details depend on your style. What matters is that you’re not improvising based on fear or excitement.
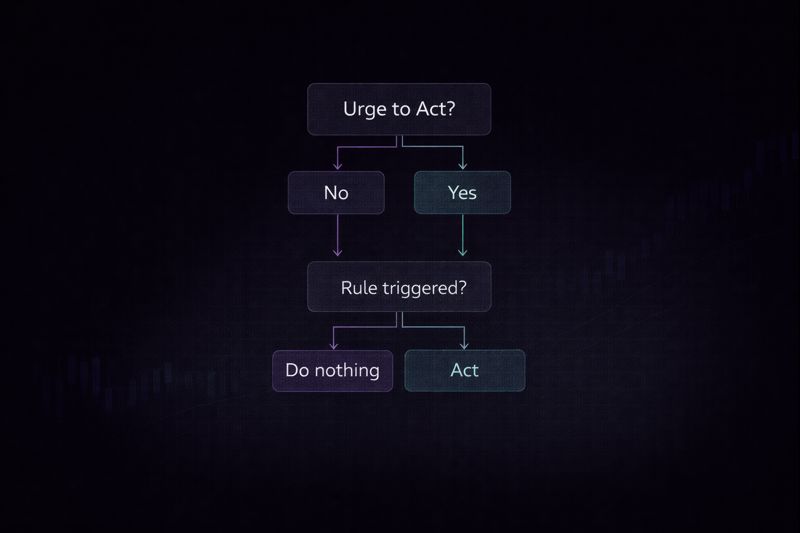
The “urge test”
When you feel the urge to change something mid-trade, ask one question:
“Is this action triggered by my rules… or by my feelings?”
If it’s feelings, you pause. If it’s rules, you act.
That one question prevents a lot of damage.
During-trade checklist (tiny)
- I follow my default behavior (hands off)
- I act only if a rule triggers action
- If I feel urgency, I pause before touching anything
Post-trade checklist: turn every trade into improvement
If you want to improve quickly, post-trade matters.
Because without post-trade review, you don’t learn. You just experience.
And experience alone doesn’t create skill. Structured feedback does.
The goal of post-trade isn’t to write a long journal entry. The goal is to capture the essentials while they’re still fresh, so you can review patterns later.
Capture what matters, not everything
A good post-trade capture is lightweight:
- a screenshot,
- a one-sentence reason for entry,
- your stop and target logic,
- and whether you followed rules.
That’s enough to see patterns.
Grade execution, not outcome
A win can be bad trading if you broke rules.
A loss can be great trading if you followed your process.
If you reward only outcomes, you train yourself to repeat mistakes whenever they happen to work. If you reward execution, you build a stable process that holds up over time.
One lesson only
Don’t try to fix everything at once. Pick one lesson from the trade that will actually change behavior next time.
For beginners, one consistent improvement is far better than ten small intentions that never stick.
Post-trade checklist (short)
- Screenshot saved
- One-sentence entry reason logged
- Execution graded honestly
- One lesson recorded
End-of-day checklist: close the loop and protect tomorrow
This is the part that prevents “one more trade.”
Many traders spiral late in the session because they’re tired and emotionally invested in finishing green. That’s understandable—but it’s not a good decision-making environment.
End-of-day is where you shut the door on the session so tomorrow starts clean.
A simple end-of-day process looks like this:
You review whether you followed your checklist. You mark any rule violations and what triggered them. You prepare the next session’s key levels and watchlist. Then you shut down at a consistent time.
That final step matters. A consistent stop time is a form of risk management. If you stop only when you “feel done,” you’ll keep trading during your most emotional moments.

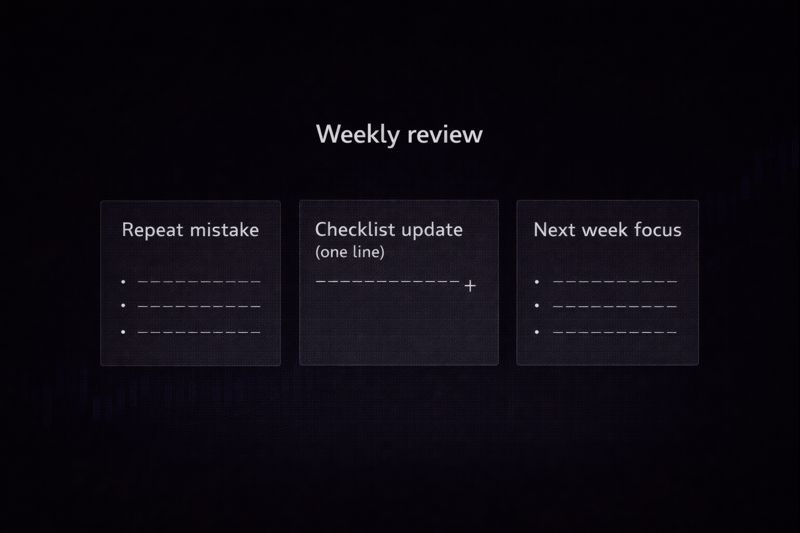
Weekly review: keep the checklist lean and evolving
Here’s the trap: many traders keep adding items to their checklist until it becomes unusable.
A checklist that’s never used is worse than no checklist.
So the weekly review has one job: keep the checklist short and effective.
Instead of trying to optimize everything, identify the one or two patterns that cause most of your problems. For many beginners, it’s something like:
- taking “B” setups,
- chasing entries,
- moving stops,
- trading after hitting a daily loss threshold.
Then you adjust the checklist slightly to block that pattern.
One change is enough.
For example, if you notice most mistakes happen after two losses in a row, you add one line: “After two consecutive losses, I take a 20-minute break.” That single line can save you more money than any strategy tweak.
The weekly review also gives you a focus for the next week. One focus is powerful. Ten focuses are noise.
The 10-second trading checklist
This is the version you can run right before you enter.
It’s intentionally short because you’ll actually use it.
Read it and answer honestly. If any answer is “no,” your default is to pass.
This is my setup.
The trigger is present.
My stop is invalidation.
My size matches fixed risk.
No-trade filters are off.
The complete trading checklist template
Here’s a one-page template you can copy and keep beside your screen. It’s structured around the essential phases so it works whether you trade forex, indices, stocks, or crypto.
Pre-market
I’m in a state to follow my rules (or I reduce risk / skip).
I checked the calendar and identified volatility windows.
I can describe the market condition in one sentence.
Key levels are marked; I have simple if/then scenarios.
My watchlist is focused and intentional.
My platform and layout are ready.
Pre-trade
This is an A-quality setup (or I pass).
The entry trigger is present (not “close enough”).
My stop is based on invalidation.
My position size matches my fixed risk rule.
The trade has enough room to justify the risk.
No-trade filters are not active.
During-trade
I follow my default rule: hands off unless a rule triggers action.
I do not adjust stops or targets for comfort.
If I feel urgency, I pause before acting.
Post-trade
Screenshot saved.
One-sentence entry reason logged.
Execution graded honestly.
One lesson recorded.
End-of-day
I reviewed process first.
I recorded any rule violations and triggers.
I prepped watchlist/levels for tomorrow.
I shut down at a consistent time.
Weekly review
I identified my top repeating mistake.
I updated the checklist with one change.
I set one focus for next week.
Three example checklist adaptations (so it fits your style)
A checklist is most powerful when it matches what you trade. Below are three simple adaptations that keep the structure the same but adjust the pre-trade gate.
Breakout-style checklist (built to prevent chasing)
Breakout traders often lose money by entering late, because a fast move triggers panic. This version emphasizes trigger clarity and a strict “no chase” rule. If the breakout happens without you, you pass. The market will offer another trade. Your job is to protect your process.
Pullback-style checklist (built to prevent early entries)
Pullback traders often lose money by entering before confirmation. This version emphasizes patience: you don’t enter because price is “close to the zone,” you enter when the condition completes and your trigger appears.

Range-style checklist (built to prevent fading momentum)
Range trading punishes bad location. The checklist emphasizes entries near range edges, invalidation clarity, and a simple “no trade” filter when price is accelerating strongly.
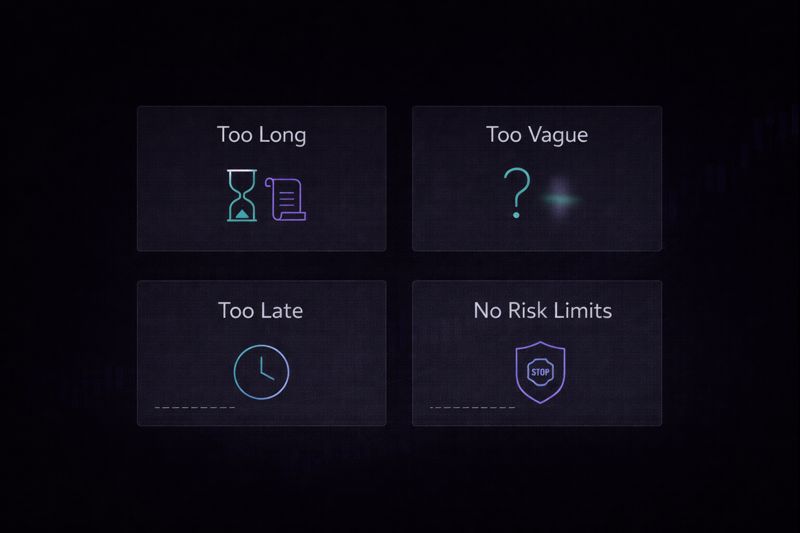
Common checklist mistakes (and how to fix them fast)
If you want the checklist to actually change your trading, watch out for these.
The first mistake is making it too long. If the checklist is painful to use, you’ll skip it when it matters most. Keep the live version tiny, and use the full version for prep and review.
The second mistake is writing vague items that can’t be answered honestly. Replace “good trend” with a specific condition. Replace “strong setup” with clear rules.
The third mistake is running the checklist after you’re already attached to the trade. The checklist must be the gate before entry. If you treat it like a formality, it won’t protect you.
The last mistake is ignoring risk limits because you feel emotional. Your daily loss limit and no-trade filters exist specifically for that moment. They are not optional.
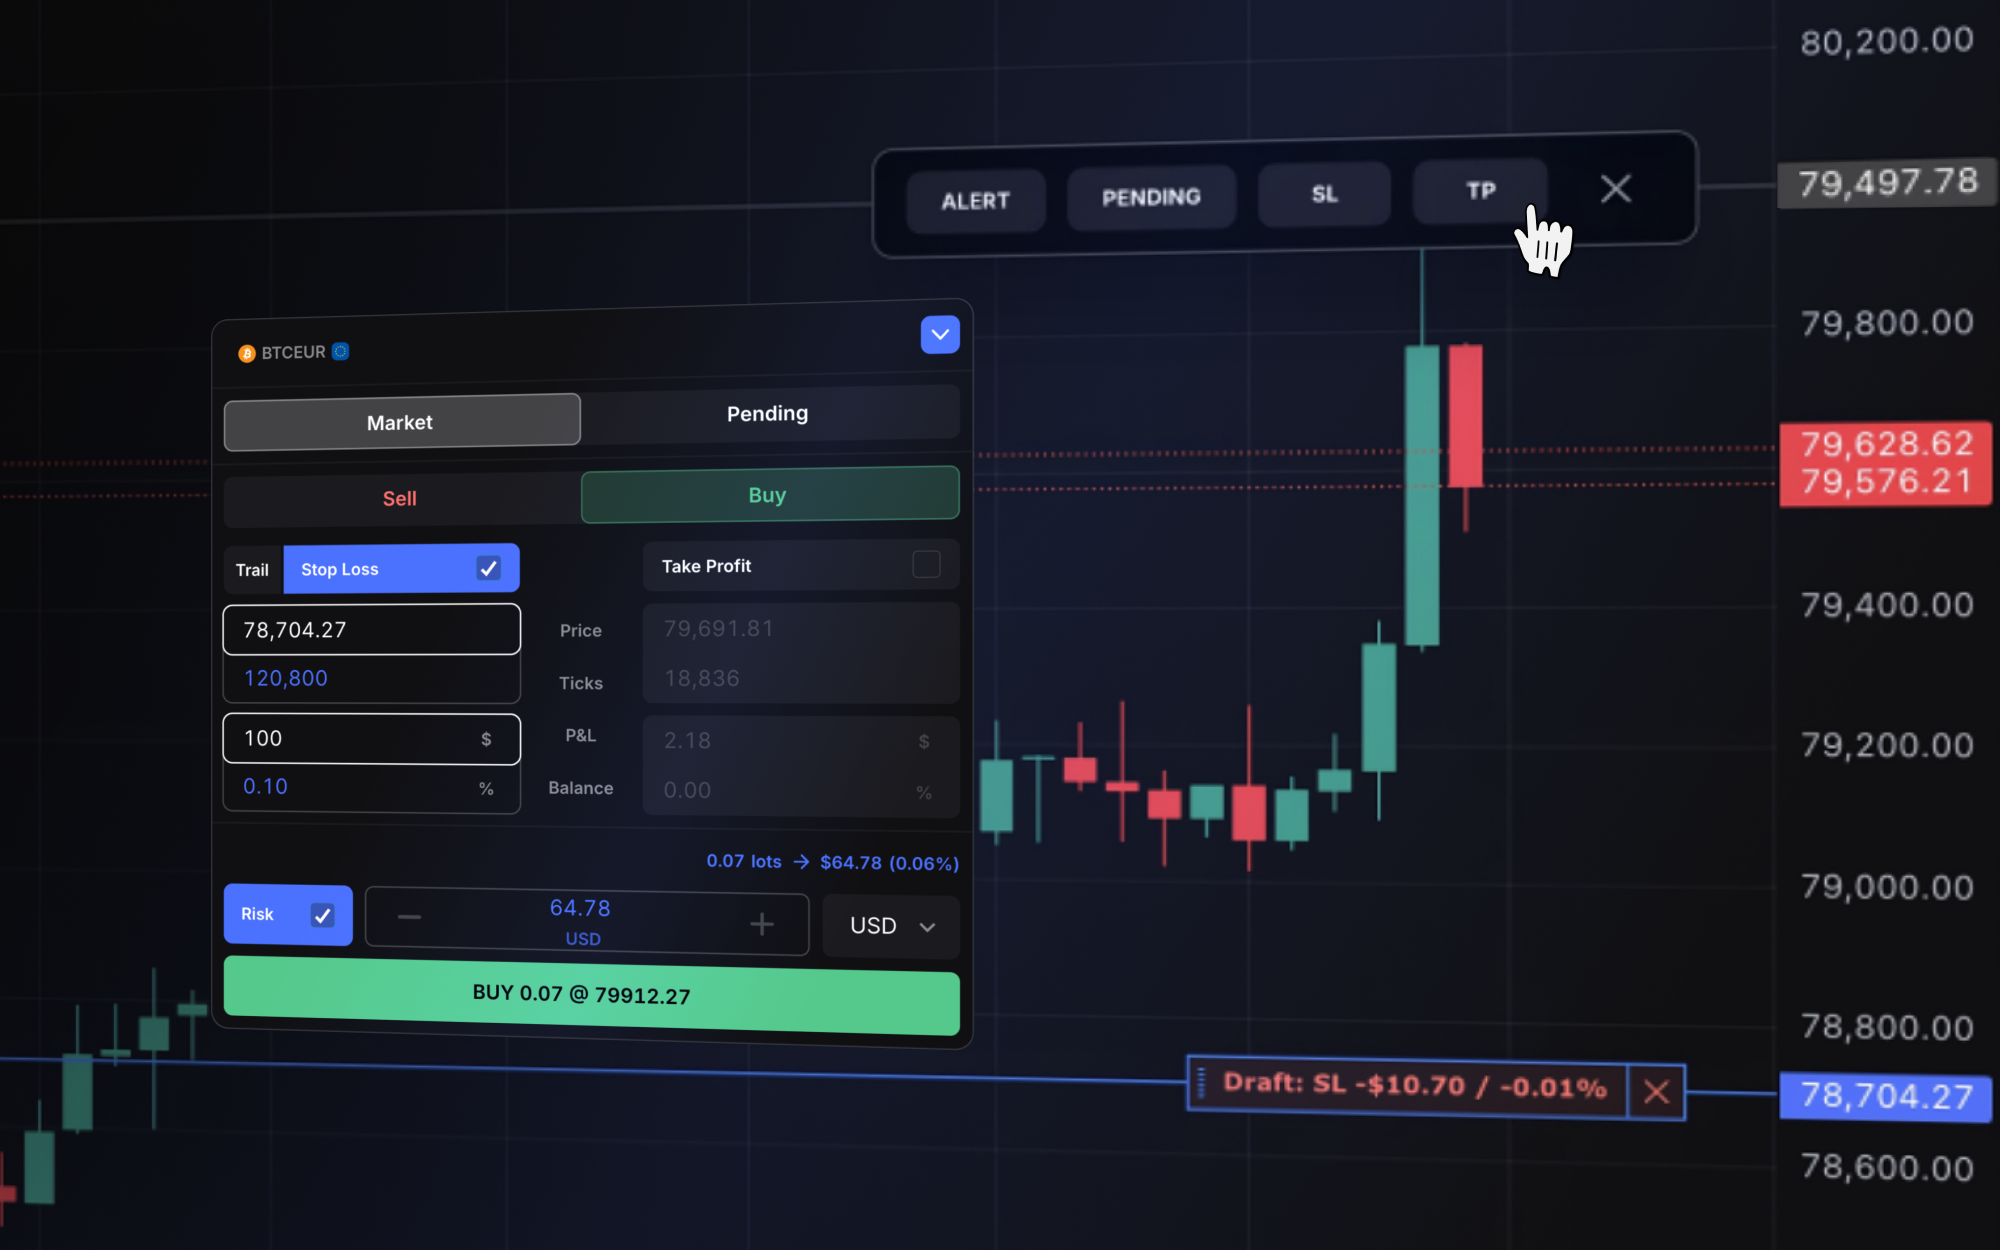
How to implement your checklist in TradeLocker (simple workflow)
A checklist is only useful if you can execute it with minimal friction.
The goal is to reduce the gap between “my rules say I should do this” and “I can do it quickly before emotions take over.”
A practical workflow inside TradeLocker looks like this:
You keep a focused watchlist so you’re not scanning endlessly. You mark levels and set alerts so you’re not staring at the screen waiting. You make risk mechanical by setting stop loss and take profit as part of the entry process. Then you review your trades using a consistent post-trade capture so your weekly review is easy.
It’s not about fancy tools. It’s about supporting discipline with a clean workflow.
Conclusion
A trading checklist won’t eliminate losing trades.
But it will eliminate many of the losses that come from avoidable behavior: chasing, oversizing, moving stops, and trading when you shouldn’t.
More importantly, it gives you something every trader needs to improve: a stable process you can review.
If you take one action after reading this, make it this:
Use the 10-second checklist before every entry for the next two weeks. Keep risk fixed. Pass on anything that feels “close enough.” Then review what changed—especially in your decision-making, not just your P&L.
That’s how consistency is built.
Disclaimer: This article is educational and not financial advice.
